Interesting Science Videos
What is the Negative staining of Viruses?
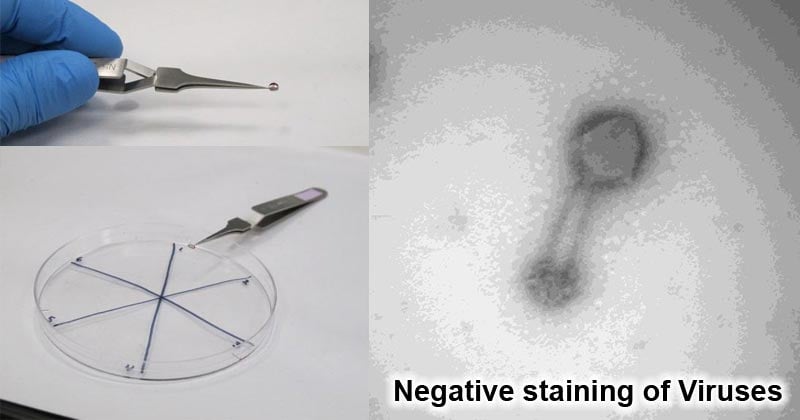
Staining techniques are designed to show contrast under microscopic observation. The staining of viruses is done to increase the contrast between the virus and the background. The use of an electron microscope intensifies the density of electron toward the stain. Negative staining is one of the most excellent techniques in studying viruses, bacterial morphologies. Negative staining of viruses stains the background, leaving the virus uncoated or untouched by the stain. This means that the stain is visible around the viral particle, defining its structure and it can also penetrate the small projections around the virus describing its physiology. Any damages around the virus that gain access to the stain can be revealed and it may disclose parts of the internal structures of the viral particle.
- Negative staining is done using support films as the specimen holders and heavy metallic stains.
- Support films can be plastic films or thin carbon films; plastic films become hydrophobic over time, therefore, require frequent cleaning while carbon films that often give better outcomes are evaporated onto the surface of freshly cleaved mica (a sheet of metallic metal) by heating carbon at high temperatures under vacuum.
- The heavy metals in the stain shadow the viruses during visualization.
- The heavy metallic elements found in the stain are platinum such that during visualization, the area that is coated with metal scatters electrons and appears light in photographs, and the uncoated side and the shadowed areas appear dark.
- The appearance created by the specimen is as if a light was shining on it to create a shadow.
Objectives of Negative Staining of Viruses
To visualize, and identify viral physiological features under an electron Microscope
Principle of Negative Staining of Viruses
- Negative staining of viruses involves the use of a support film where the specimen or sample is placed.
- Using the carbon support film, the specimen of a small concentration is added such as for viral samples a small concentration of 0.05 and 0.1 mg ml− 1 and for intact virus particles such as adenoviruses and influenza viruses, a concentration of 1 mg ml− 1 should be used.
- The specimen is then flooded with a heavy metal salt which is left to air dry allowing the stain to dry around the specimen molecules.
- The specimen is incorporated on a support film (specimen holder).
- The most preferred support film is carbon-film, which gives better results than the plastic film.
- The outer surface of the carbon film is hydrophobic but its interface is clean and hydrophilic.
- The sample is sucked in between the carbon film and the mica layer.
- When the sample has been absorbed by the carbon film, the film is the floated in a pool of negative stain which can be uranyl acetate or ammonium molybdate or sodium silicotungstate.
- A copper grid is placed on top of the stained floating carbon film.
- The grid can be picked by placing small pieces of paper on the grid, and as the paper become wet, it is lifted up taking the grid and the carbon film along from the satin pool.
- The carbon films that stick out of the copper grid at the edges create carbon layers with the stain hence a paper-grid-carbon-sample sandwich.
- This sandwich complex is then placed on a filter paper to allow blotting and to air dry before visualization under the Electron Microscope
- The use of an electron microscope allows maximum resolution to obtain a colored image of the sample, and preferably, the use of the Transmission Electron Microscope has been used when visualizing viruses and their components.
- The molecules will appear light while areas, where there are spaces, will appear darker i.e opaque to electrons.
- Samples viewed under the Transmission electron Microscope must always be prepared specially for observation and creation of a quality image of the sample by fixation, dehydration, sectioning, and staining.
- This produces a strongly colored image of the specimen.
Preparation of Viral samples for Staining and Visualization under a Transmission Microscope
By the use of the Electron Microscope, the specimen must be impregnated with heavy metallic salts of uranium or tungstenium. Each of these metals is prepared in compound complexes at varying pH and also depending on the type of virus to be stained.
- Uranyl acetate which contains uranium has a low pH of 4.4. It is commonly used to stain enveloped viruses by binding the uranyl ios to the negatively charged lipid enveloped heads to stabilize the viral membrane. It stains the upper part of the virus particles and it does not closely stain the support film. It produces a superimposed image of the surface of the support film and the image of the opposite side of the viral particle. Disadvantageously, uranyl acetate is known to react with nucleic acids, proteins, and lipids which may cause a positive stain result instead of a negative stain, and it can be radioactive.
- Sodium silicotungstate (SST) which contains tungstenium and contains silicotungstic acid. The acid is solubilized in water, neutralized with NaOH, and precipitated with ethanol (cold), this forms a neutral pH and it is a chemically inert stain. It binds closely to the support film and outlines the morphological and physiological features of the virus that are bound to the film, including the viral proteins. However, the stain produces a large stained molecule which may be difficult for visualization limiting the image resolution. It is a useful stain for visualization of small viral proteins.
- Ammonium molybdate with a neutral pH holds firmly to the support film after drying. Therefore it has been used to visualize large viral particles such as orthomyxoviruses. It offers high contrast compared to other stains under microscopy however, it can only show or visualize the outer part of the particles, which is advantageous for negative staining.
Procedure for Negative staining of Viruses
Materials and reagents required
- EM grid-grade tweezers (2 or more pairs)
- uranyl acetate
- ultra-purified water (e.g. Milli-Q water)
- petri dish
- 4x 2 ml microcentrifuge tubes with screw caps
- 4 ml plastic culture tube with cap
- small stir bar
- stir plate
- filter paper (cut into wedges)
- 0.02 µm syringe filter and syringe (3-5 ml)
- lab coat, respiratory protection (mask), eye protection
- timer
- waste container for uranyl acetate
Preparation of Uracyl acetate
- 0.04 g uranyl acetate + 2 ml ultra-purified water = 2% uranyl acetate
Procedure Negative staining of Viruses on a Grid using Uranyl Acetate
- Prepare 2ml of 2% uracyl acetate using ultra-purified water in a 4ml tube and stir to mix the sample for about 30minute to 1 hour.
- Filter the uracyl acetate solution using a 0.02 µm syringe filter into a 2 ml screw-cap tube to remove undissolved particles of uracyl acetate.
- Hold the grid in Electron Microscope grid-grade tweezers.
- Add three drops of uranyl acetate using a pipette, to the shiny side of the grid, and allow it to run-off wasted solution into the waste container.
- Add another drop of the uranyl acetate to the shiny side and allow it to sit for 45 seconds.
- Take a filter paper and wet its wedge with ultra-purified water.
- Using the wet wedge of the filter paper, wick away the stain from the grid leaving a thin sheen of the stain on the grid.
- Set the tweezers with the grid on a dry petri dish, away from any objects, and leave it to dry for about 1 hour.
- Observe under an Electron Microscope.
Caution:
- uranyl acetate is toxic so, use a lab coat, eye protection, respiratory mask, and gloves when handling it in powdered form;
- too much stain left on the grid and all you will see in the TEM is stain;
- too little stain left on the grid and your viruses will not be negatively stained.
Results and Interpretation

- Electron micrographs of different viruses reveal different features of the viruses.
- For example, Adenovirus shows long fibers that stick out of about 120-350kDa and penton bases of about 300kDa.
- Orthomyxoviruses reveal spiked surfaces along with their morphology.
- Rotaviruses show compact numerous particles of the virus depending on the sample the specimen is collected from.
Advantages of Negative Staining of Viruses
- It is easy to perform.
- It is a rapid technique.
- It does not require special equipment to perform.
- Negative staining offers a rapid platform for visualization of the small viral proteins and helps determine their oligomeric state.
Limitations of Negative Staining of Viruses
- During air-drying, fragile specimens such as enveloped viruses may flatten and squeeze out lipid blebs.
- During adsorption, the molecular forces involved can cause conformational changes including the physiological shrinking of the virus and lipids may become rigid/compact making visualization difficult.
Applications of Negative Staining
- To study viral morphologies, physiologies such as surface antigens, spikes, filaments, etc.
- To study bacterial morphologies such as flagella and ciliary fragments.
References and Sources
- Microbiology by Prescott, 5th Edition
- https://www.intechopen.com/books/microbiology-in-agriculture-and-human-health/negative-and-positive-staining-in-transmission-electron-microscopy-for-virus-diagnosis
- https://www.sciencedirect.com/science/article/pii/B9780128012383025630
- https://experiments.springernature.com/articles/10.1007/978-1-59745-294-6_7
- http://web.path.ox.ac.uk/~bioimaging/bitm/instructions_and_information/em/neg_stain.pdf
- https://en.wikipedia.org/wiki/Negative_stain
- https://cpb-us-west-2-juc1ugur1qwqqqo4.stackpathdns.com/u.osu.edu/dist/e/20087/files/2015/08/Positive_and_Negative_Stainging_of_Viruses_on_TEM_Grids-239c21p.pdf
