Interesting Science Videos
Introduction
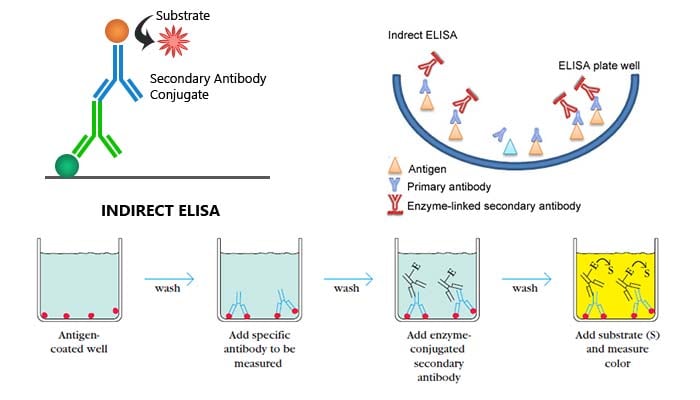
Indirect ELISA is a two-step ELISA which involves two binding process of primary antibody and labeled secondary antibody. The primary antibody is incubated with the antigen followed by the incubation with the secondary antibody. However, this may lead to nonspecific signals because of cross-reaction that the secondary antibody may cause. In the indirect ELISA test, the sample antibody is sandwiched between the antigen coated on the plate and an enzyme-labeled, anti-species globulin conjugate. The addition of an enzyme substrate chromogenic reagent causes color to develop. This color is directly proportional to the amount of bound sample antibody. The more antibody present in the sample, the stronger the color development in the test wells. This format of indirect ELISA is suitable for determining total antibody level in samples.
The indirect ELISA is used for the quantitative estimation of antibodies in the serum and other body fluids. In this method, specimens are added to microtiter plate wells coated with antigen to which specific antibodies are to be detected. After a period of incubation, the wells are washed. If antibody was present in the sample, antigen–antibody complex would have been formed and will not get washed away. On the other hand, if the specific antibody was not present in the specimen, there would not be any complex formation. Then, an anti-isotype antibody conjugated with an enzyme is added and incubated. After another washing step, a substrate for the enzyme is added.

If there was complex formation in the initial step, the secondary anti-isotype antibody would have bound to the primary antibody, and there would be a chromogenic reaction between the enzyme and substrate. By measuring the optical density values of the wells, after a stop solution has been added to arrest the chromogenic reaction, one can determine the amount of antigen–antibody complex formed in the first step.
Steps/process of Indirect ELISA
- Micro-well plates are incubated with antigens, washed up and blocked with BSA.
- Samples with antibodies are added and washed.
- Enzyme linked secondary antibody are added and washed.
- A substrate is added, and enzymes on the antibody elicit a chromogenic or fluorescent signal.
Advantages of Indirect ELISA
- High sensitivity: More than one labeled antibody is bound per antigen molecule;
- Flexible: Different primary detection antibodies can be used with a single labeled secondary antibody;
- Cost-saving: Fewer labeled antibodies are required.
Protocol of Indirect ELISA
- Coat microtiter plate with antigen: Dispense 50 μl antigen solution (coating reagent) into the wells of a microtiter plate.
- Wrap coated plates in plastic wrap to seal and incubate for 2 hr at 37 0C in an incubator.
- After incubation, uncover the microtiter plate and discard the solution into a container.
- Washing Step: Remove coating solution and wash the plate twice by filling the wells with 200 µl PBS. The solutions or washes are removed by pipetting. The remaining drops are removed by patting the plate on a paper towel.
- Blocking step: Block the remaining protein-binding sites in the coated wells by adding 200 µl blocking buffer and incubate 30 min at room temperature.
- Discard the solution and perform the washing step. Gently flick microplate onto paper towel
- Add 50 μl of antibody solution using micropipette from the vial to the wells.
- Wrap plate in plastic wrap, and incubate for 2 hr at room temperature. Discard liquid and pat bottom of plate with dry absorbent paper.
- Repeat washing step
- Repeat blocking step.
- Repeat washing step.
- Add 50 μl secondary antibody reagent to the wells.
- Wrap the micro titer plate in plastic wrap, and incubate 2 hr at room temperature.
- Repeat washing step.
- Add 75 µl substrate solution from vial to the wells on micro titer plates.
- Wrap the micro titer plates in plastic wrap and incubate for 1 hr at room temperature.
- Add 25 µl stop solution (0.5 M NaOH) from vial to the wells on micro titer plates.
- Using a micro titer plate reader to measure NPP hydrolysis, use a 405-nm filter.
